Table of Contents
Installing and Configuring Koha's REST Plugin
Thanks to Mariyapillai Jayakananthan and Mohan Pradhan for developing this documentation.
Prerequisite
These instructions assume that you have already installed Koha version 22.05 in a Debian-based Linux environment. Later versions of Koha may look different from the provided screen shots, and different operating systems may have minor differences in some commands.
The example assumes that the Koha ILS is installed on one server and VuFind will be installed on another server. However, this process should also work with both systems installed on one server.
Configuration at the Koha side
The RestApi plugin is used for accessing real-time data from Koha.
The following steps will be followed to configure the plugin at the Koha side.
Configure koha-conf.xml
1. Edit the koha-conf.xml file. It is located in the path /etc/koha/sites/<instance name>.
In our case, the instance name is pasantha. In your case, it may be different.
root@debian:/etc/koha/sites/pasantha# nano /etc/koha/sites/pasantha/koha-conf.xml
After opening the koha-conf.xml file, change the line:
<enable_plugins>0</enable_plugins>
to
<enable_plugins>1</enable_plugins>
Save the file after making this change and run the command:
sudo service apache2 restart
2. Download the most up-to-date .kpz plugin file from https://github.com/NatLibFi/koha-plugin-rest-di/releases.
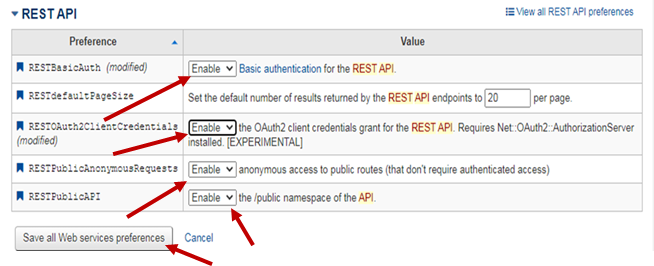
3. In the Koha staff interface, go to: Home → Koha administration → Global system preferences → Web services and find the REST API section. By default, it is set to 'Disable.'
Set each dropdown (RESTBasicAuth, RESTOauth2ClientCredentials, RESTPublicAnonymousRequests and RESTPublicAPI) to 'Enable' and then click the Save all Web service preferences button, as shown below:
Upload the Plugin
Go to Home → Administration and click Manage Plugins. The output will be as follows:
Click the Upload plugin button as shown above.
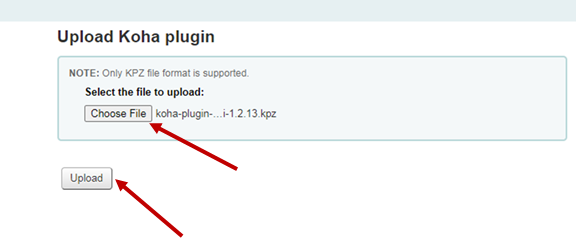
You will then be prompted to select a file:
Choose the file you downloaded earlier (the filename will be something similar to koha-plugin-rest-di-22.05.06.kpz), and click the Upload button.
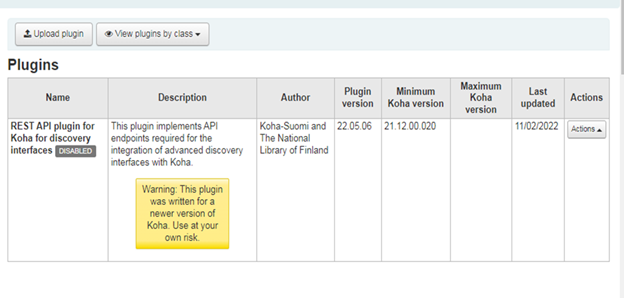
When you view the Plugins list, you will see that the REST API plugin is set as DISABLED. Go to Actions at the far right and select Enable, as shown below.
The plugin will now be ENABLED, as shown here:
If you don’t have the latest version of Koha installed, then the warning message message below will appear on your screen:
If you have the most recent version, you will not see that message.
Configure Plack
Plack can increase the performance of Koha. Plack is included with Koha by default, but in some cases it may need to be enabled. Check your About Koha page to see if it’s running or not.
To enable Plack, enter the following commands, replacing “libraryname” with the appropriate name for your own Koha instance:
sudo a2enmod headers proxy_http
sudo koha-plack --enable libraryname
sudo koha-plack --start libraryname
sudo systemctl restart apache2
Then check your About Koha page. You should see PSGI: Plack (deployment) under Server Information if Plack is running and configured correctly.
Configure the EnvAuthorisation setting
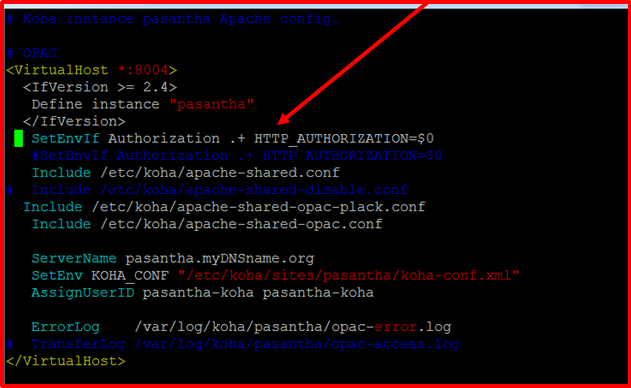
Add the following line as shown below in /etc/apache2/sites-available/<instance.conf> (where “instance.conf” is the Apache configuration filename for your Koha site):
SetEnvIf Authorization .+ HTTP_AUTHORIZATION=$0
Save your change and run the command
sudo service apache2 restart
Create a Client ID and Secret Key from the Patrons area
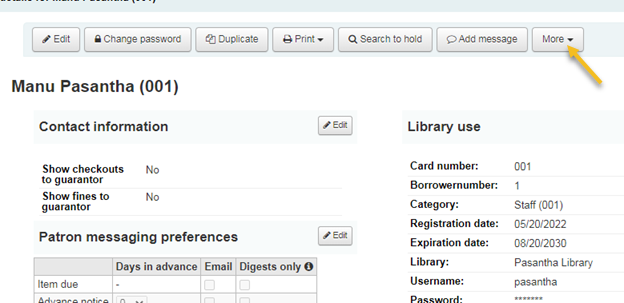
Go to: Home → Patrons and select a patron. We will use patron Manu Pasantha as an example.
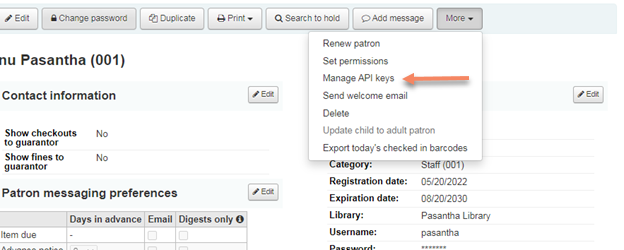
Go to More → Set Permission and grant Access to all library functions to this user.
Go to More → Manage API keys.
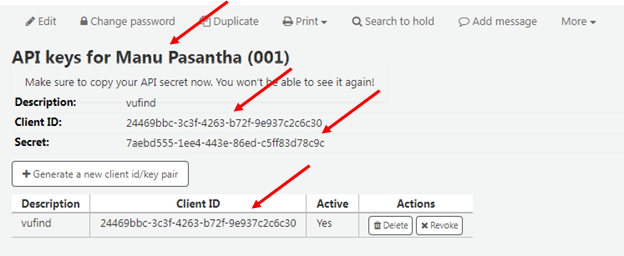
Click the link to Generate a new client id/secret pair. Under Description, enter “vufind” as illustrated below.
Once a value such as vufind is entered and saved, the system will display a Client ID and Secret key for the patron, as shown below:
Note the Client ID and Secret key; you will need these later when configuring the KohaRest ILS driver.
Verify whether the API is working
Go to
http://[staff-or-opac-ip-or-hostname]/api/v1/.html
If successful, you will see the following heading among the others:
If this heading is not displayed, go to Home → Koha administration→ Global system preferences→ Web services.
Set the RESTOAuth2ClientCredentials option to “Enabled.”
If it is already enabled, disable and save it. Then enable it again and save it.
Now recheck again by again trying to access the URL:
http://[staff-or-opac-ip-or-hostname]/api/v1/.html


