Table of Contents
Lokalise
The VuFind® project uses Lokalise to manage its internationalization. This page provides some notes on how to utilize the platform effectively.
Notes for Translators
Volunteer translators can be granted access to one or more languages used by the project. It is then possible to edit and add translations through a web-based interface. If you would like to volunteer as a translator, please contact info@vufind.org and let us know which language(s) you can help with.
Useful Resources
- Training video on YouTube: Lokalise editor for translators tutorial
- FOLIO's guide to using Lokalise: How to Translate FOLIO
Getting started
1. Log into Lokalise using the “Open project” link in the email invitation from Lokalise. You'll need to set your password the first time you log in. Use this direct link to Lokalise in the future.
2. From the dashboard, click the name of the language you are going to work on. This will bring you to the Editor view.
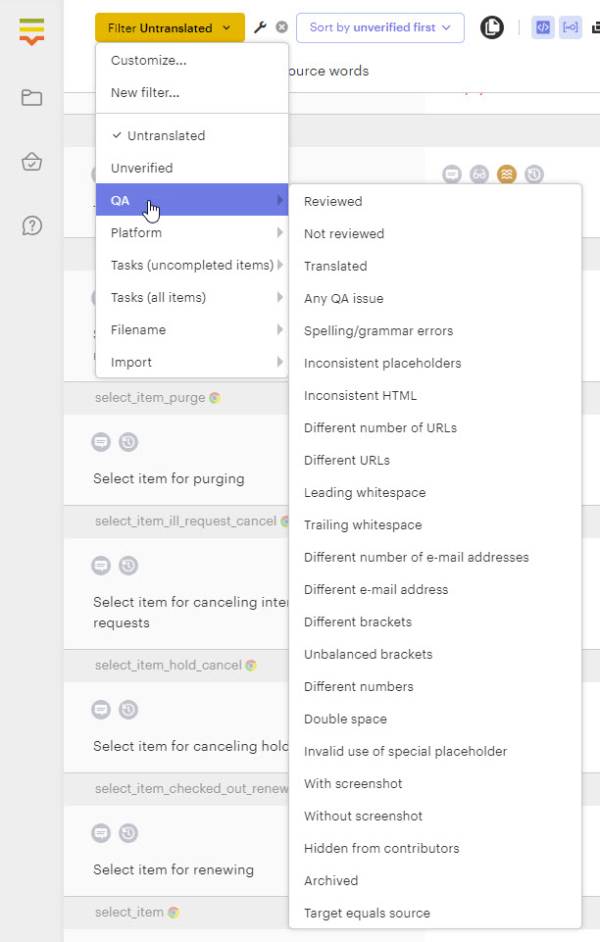
3. Make sure the FILTER is set to Untranslated to see the list of words and phrases that need translation. Disregard any entries labeled @parent_ini; these do not need your attention.
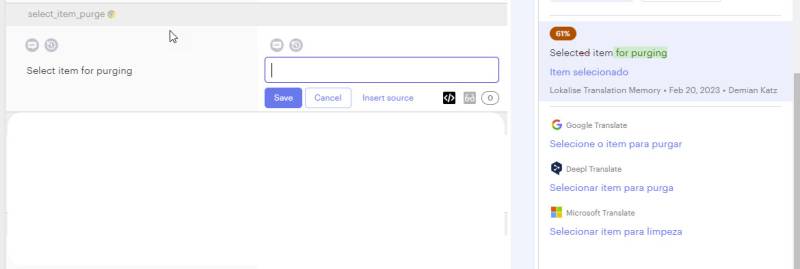
4. Identify an item you'd like to translate. The term to be translated will be on the left side, and the word Empty will be on the right side. This is the view within the full list:
5. To enter your translation, click the word Empty. This will open a text entry box into which you can type the translation in your target language.
6. Lokalise will also offer options for machine-generated translations in the right hand sidebar; you can click one of those, and it will populate the text entry box with that translation. You can use that translation as it is, or you can edit it.
7. Click Save when you are ready to save the translation.
Additional Suggestions
Access words in text domains
To access text domains within the VuFind word/phrase list, click Filter, Filename. This will allow you to focus on such areas as CallNumberFirst, ILSMessages, and DDC23.
Check entire word list for formatting issues
To check for formatting issues within the existing language entries, click Filter, QA (Quality Assurance). You can focus on issues such as extra whitespaces, unbalanced brackets, HTML issues, etc.
Notes for Administrators
Lokalise users with administrative access have the power to update Lokalise with the latest translations in the project's GitHub repository, and to export the latest Lokalise translations into the project.
Importing Translations from VuFind®
Lokalise is currently set up to automatically update via webhooks when GitHub receives a push.
However, if you wish to manually load translations from VuFind®'s GitHub repository into Lokalise, or if you want to double-check the configuration of the automated process, follow these steps:
- Log in to Lokalise and go to the GitHub app page within the site.
- The VuFind Github Repo is listed twice as Lokalise struggles with the available settings to add new tokens and update existing translations in a single run
- First instance:
- Double-check that the following pull options are set to ON (and all other options are OFF):
- Replace \n with line break
- Differentiate keys by file
- Cleanup mode
- Click “Pull now”
- This will pull all *new* translation tokens into Lokalise
- Second instance:
- Double-check that the following pull options are set to ON (and all other options are OFF):
- Replace \n with line break
- Differentiate keys by file
- Replace modified values
- Click “Pull now”
- This will pull changed translations into Lokalise

Note that language mappings for both Github instances need to be identical (e.g. Basque and Basque(Spain), Galician and Galician(Spain)) otherwise languages will show twice with different names.
Note that it may take a few minutes for processing to complete.
Exporting Translations to VuFind®
To export the latest Lokalise translations into VuFind®, follow these steps:
- Log in to Lokalise, and go to the “download” page.
- Make sure the following download options are set:
- File format: PHP INI (.ini)
- Languages: All
- File structure: Multiple files per language
- Content to export: Data: All
- Advanced settings: Don't use directory prefix
- Empty translations: Don't export
- App triggers: Ensure that GitHub is unchecked to prevent unwanted PR creation
- …other settings should not matter.
- Click “Build and download”
- On a machine with the latest VuFind® dev branch checked out, unzip the downloaded .zip file somewhere (e.g. /tmp)
- Run
php $VUFIND_HOME/public/index.php language/importlokalise /tmp/language $VUFIND_HOME/languageto load the updated translations (replace /tmp/language with the location of your unzipped files, if you chose somewhere other than /tmp). - Use
git diffto inspect the loaded translations and make sure they are complete, appropriate and correct. - If all is well, commit the changes!


